
Connecting To A Proxy Server - Part 2

Previously, We have seen what a proxy server is, it’s advantages and some web that tells you about your connection. However, you must be clear that proxy and VPN are not the same and that a proxy server does hide your IP but does not eliminate more identifying data. Next, we are going to show you how to connect to a proxy.
HOW TO CONNECT TO A PROXY SERVER
Step 1: Find a proxy server to connect
The first step to connect to a proxy server is to look for a proxy server. To look for a free proxy server to which we can connect is very easy. All you have to do is google and put a proxy list. In my case, I have done it and I see for example that there is the following service:
Other similar web pages: http://www.hidemyass.com/
http://www.atomintersoft.com/free_proxy_list
Step 2: Choose the type of proxy server to which we want to connect
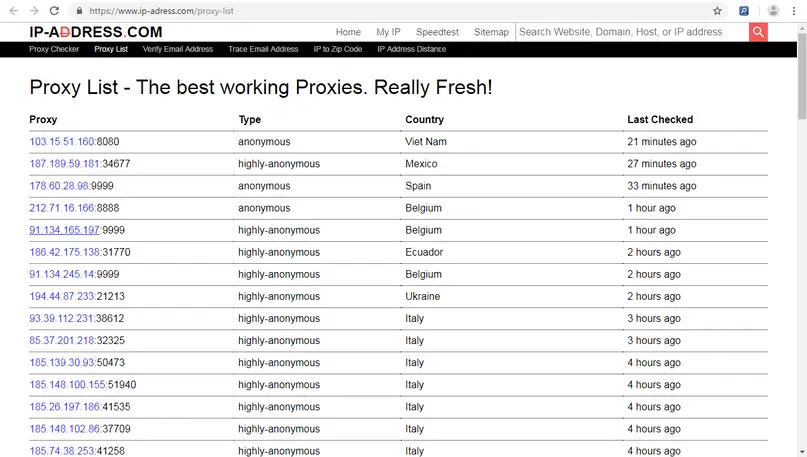
Once we have accessed inside the website, we will see the information that resembles the one you can see in the following screenshot:

Each of the lines we see in the screenshot shows a different proxy server. Now we have to choose one of the servers that are shown in the list. In the first thing, we have to look at the type of server.
In the screenshot, we see that there are 2 types. Anonymous and Highly-Anonymous. There is also a third type that is transparent. Among the 3 types, I only recommend using Anonymous and Elite. The reasons are the following: Transparent Proxy: At all costs, we must avoid this type of proxy. The main reason to connect through a proxy is to get anonymous and transparent proxy will not achieve our goal at all. We will not succeed because this type of proxy provides all the data mentioned in the previous section to the web server to which we connect. Therefore, our IP will be visible at all times.
Anonymous Proxy: This type of proxy is already recommended. If we want to use a proxy just to navigate is more than enough for us. This type of proxy no longer reveals our real ip since it is masking the variable http_x_forwarded_for. Therefore with the use of this proxy, we can already affirm that we are anonymous. This type of proxy has the disadvantage that the web server will have the ability to know that we are connecting through a proxy server but can never know our ip.
Proxy Elite or highly anonymous: This type of proxy as well as the anonymous proxy is masking the variable http_x_forwarded_for, but also other variables such as http_via and http_proxy_connection, etc. Therefore we will be falsifying the totality of information that we deliver to the web server and also they will not be able to detect that we are connecting through a proxy server. The proxy server will also not keep a record of the IPs connected to the proxy server.
Step 3: Choose the proxy server to which we are going to connect
Once we have seen the types of existing proxy server, we must now choose the one we will connect to. We will connect to the first proxy in the list. It is a proxy located in the Viet Nams and is anonymous. As you can see in the screenshot, there is a field in which an IP and a port are indicated, which are: 103.15.51.160 and 8080. These are the only two data needed to connect to the server.
Note: There are web pages that indicate whether the proxy offers an SSL encryption service. As a general rule, proxy servers do not usually offer an SSL encryption service. Note: Therefore the conclusion is that you choose servers of the anonymous or highly-transparent type. If in addition, these servers offer a better SSL encryption service. Once connected to the proxy server we can analyze if the speed offered is acceptable or not.
Step 4: Configure the browser to connect to the proxy server
In this section, we will see how to configure the browser to connect to the proxy server. In the example we use Firefox. The most advisable to make the connection is to use the Foxy Proxy Standard add-on. To install Foxy Proxy standard we open the browser. Once the browser is opened as you can see in the screenshot, go to the add-ons menu.
Next, a tab will open. In the search box, as you can see the screenshot, type foxyproxy and hit Enter: Once the search is finished we just have to press the install button of the FoxyProxy Standard 6.3 extension. The installation process will begin and once finished we will have to restart the browser.
Once the browser is open, we will see a small icon. We give you a click as you can see in the following screenshot:
Once we have clicked on the button of the installed plugin, the following window will open:
Now we have to press the add new proxy button. Once the button is pressed, the following screen will appear:
In step 3 we decided that we wanted to connect to the proxy server of Viet Nams of anonymous type with IP 103.15.51.160 through the port 8080. Therefore all we have to do is fill in the Host or IP Address and Port field as shown in the screenshot. Once done, we press the save button. Just when you accept it, another window will appear where you will select the new proxy you add in the drpdown as you can see in the screenshot below. At this moment we have already configured and connected to our proxy. Now that we have activated the connection we start the browser and as you can see in the screenshot and we click on the button that we have installed:
Once the button is activated, the following screen will appear:
As you can see in the screenshot, we will select new mode. In selecting mode we choose the proxy that we have just configured, which is that of the Viet Nams. Once selected, we continue surfing the web. At this time we are already connected through the proxy server.
If we want to disable the connection through the proxy server it is very easy. We just have to go to the field to select the mode and select the option off and it off FoxyProxy completely. Simply by doing this, our connection will be the same as we had previously. Note: In Chrome, there is also the same extension and the steps to follow are equivalent. There are other extensions that perform exactly the same function. In case you do not want to install extensions there is also the possibility to manually configure the browser. Note: In the case connecting often through a proxy it is good to have several proxy servers configured. If we only have one activated, it may be that at the moment we want to use it, it is not available or it no longer exists. There are also servers that will offer more speed than others. In short, it is good to have several in case one fails.
Verify that the proxy server works correctly
Once connected to the proxy, we have to check if it works and the level of security it is offering us. It is good to do it or because servers sometimes say they are anonymous and in reality they are transparent. To know if the proxy works only you have to enter an address in the browser and see if we can connect. In the case of not going well, we will have to try another proxy server. Not all proxy servers work. To configure another proxy server we will have to follow steps 2, 3 and 4 again.
To be able to test the level of protection offered by the proxy once we have connected, we only have to access the pages that we had previously connected.http://xhaus.com/headersNow the results are the following:
As you can see in the screenshots the IP is completely hidden. Now my IP and my location belong to the UAE. In the last screenshot, you can see that the variable Via appears. This is an indication that the sites where I connect can detect that I am connecting through a proxy server. Other pages that we can connect to perform checks are the following:
https://premproxy.com/anonymity-test/
http://www.internautas.org/w-testproxy.php
Limitations of proxy servers
The main limitation of proxy servers is that they allow us to be anonymous but they do not guarantee our privacy. All the traffic we generate will travel through the network without encryption. Therefore our traffic is susceptible to being sniffed. However who our traffic does not know our IP. One option for this problem is to pay or look for a proxy server that offers an SSL encryption service. Another option could be to connect through a VPN server. Other problems that the connection can generate through a proxy server are the following:
- It is important to consider who is behind a proxy server or a VPN server. If they are not reliable services, they can register all of our traffic, register our passwords, steal our bank account numbers, inject us with malicious code to become part of a Botnet. etc.
- Navigation is slower than in the case we use a VPN server.
- Each application has to be specifically configured to connect through the proxy server. Therefore, if we follow the indications of the post, only anonymous navigation will be obtained. In the case that we make a P2P download or chat, we will not be anonymous
Conclusion
Alternatives to the proxy servers are the VPN servers and the Tor network. In case you need information about VPN servers or the Tor network you can consult the following links: To find free Proxy servers to connect to, a small Google search will suffice. Of course, you must first learn about the different types of Proxy servers that exist and their characteristics to choose the right one.