How to Install ArchBang: A Step-by-Step Guide for Beginners
Table of Contents
ArchBang Linux is a lightweight and minimalistic distribution based on Arch Linux, designed for fast, customizable, and easy use. ArchBang is highly customizable and ideal for users who want to build their own custom Linux system from scratch.
There are two options to install ArchBang. Both require advanced knowledge, but we will try to explain as much as possible in this article.
The first method is to set up everything manually, from setting up a network to partitioning the hard disk and installing the system. The second method is to use the ArchBang installer.
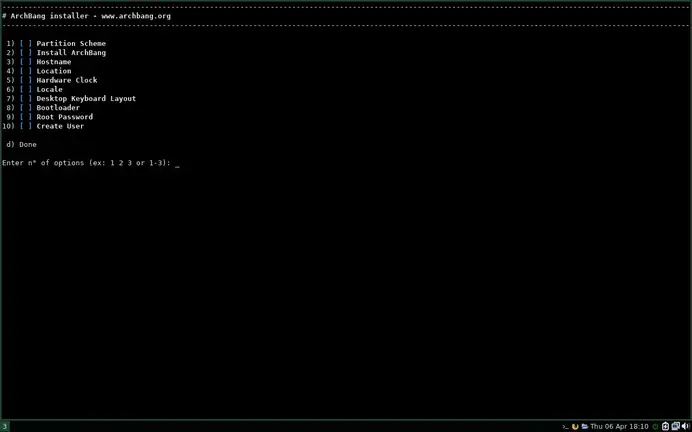
ArchBang installer isn’t like Ubuntu or Fedora installers. Instead, the ArchBang installer lists the tasks, and the user performs them individually to install the distro. Whatever manual steps I describe as the first method are steps that the installer forces the user to follow.
If it does not make sense to you, don’t worry. You will understand as you read the article. If you experience any issue, please let me know in the comment section.
Download ArchBang Linux ISO Image
You can download the latest ArchBang Linux ISO image from the official website.
Create a Bootable USB Drive
After downloading the ISO image, you must create a bootable USB drive. You can use the ‘dd’ command on Linux or Rufus on Windows to create a bootable USB drive.
Boot into the ArchBang Linux
Once you have created a bootable USB drive, plug it into your computer and boot from it. You should see the ArchBang Linux boot menu. Select ‘ArchBang Live (x86_64)’ to start the ArchBang Linux installer.
Install ArchBang Linux without Installer
Configure the Network
After booting into the ArchBang Linux live, you must configure the network settings. ArchBang Linux uses netctl to manage network connections. You can use the wifi-menu command to connect to a wireless network or the netctl command to set up a wired network connection.
Partition the Hard Drive
Once you have configured the network settings, you must partition the hard drive. ArchBang Linux uses the cfdisk tool to partition the hard drive. You can use the following command to start cfdisk –
cfdisk /dev/sdaReplace /dev/sda with your hard drive name.
You must create at least two partitions: one for the root file system and one for the swap file. The recommended root file system size is at least 20 GB. The recommended swap file size is double the RAM size in your system.
Format the Partitions
After creating the partitions, you need to format them. You can use the following commands to format the partitions:
mkfs.ext4 /dev/sda1 mkswap /dev/sda2Replace /dev/sda1 and /dev/sda2 with your partition names.
Mount the Partitions
After formatting the partitions, you need to mount them. You can use the following commands to mount the partitions:
mount /dev/sda1 /mnt
swapon /dev/sda2
Install ArchBang Linux
Once you have mounted the partitions, you can start the ArchBang Linux installation process. You can use the following command to start the installation process –
pacstrap /mnt base base-devel linux linux-firmwareGenerate fstab
After installing ArchBang Linux, you need to generate the fstab file. You can use the following command to generate the fstab file –
genfstab -U /mnt >> /mnt/etc/fstabChange the root into the New System
After generating the fstab file, you must change the root into the new system. You can use the following command to change root –
arch-chroot /mntSet the Timezone
Once you have changed the root into the new system, you need to set the timezone. You can use the following command to set the timezone –
ln -sf /usr/share/zoneinfo/Region/City /etc/localtimeSet the Hostname
After setting the timezone, you need to set the hostname for your system. You can use the following command to set the hostname –
echo hostname > /etc/hostnameReplace hostname with the name you want to give your system.
Set the Root Password
Next, you need to set a root password for your system. You can use the following command to set the root password –
passwdInstall a Boot Loader
After setting the root password, you need to install a boot loader to boot into your ArchBang Linux system. You can use the following command to install the GRUB boot loader –
pacman -S grub grub-install /dev/sda grub-mkconfig -o /boot/grub/grub.cfgReplace /dev/sda with your hard drive name.
Install Additional Packages
Finally you can install additional packages to customize your ArchBang Linux system. You can use the following command to install additional packages:
pacman -S package-nameReplace package-name with the package name you want to install.
That’s it! You have successfully installed ArchBang Linux on your system.
Install ArchBang with Installer

All the above instructions will install ArchBang Linux, and you’ll learn what commands to execute. The installer will make you do the same steps but will form and run all commands as you provide inputs.
It is a little easier to install using Installer. Although you will have less knowledge about commands-line tools.
Conclusion
Installing ArchBang Linux is an easy process that requires a few basic steps. With this article, you can install ArchBang Linux on your system and start using a fast, customizable, and lightweight Linux distribution.
Remember to back up your important data before installing ArchBang Linux, as the installation process involves partitioning the hard drive. If you have any issues or questions during the installation process, refer to the official ArchBang Linux documentation or seek help from the ArchBang Linux community.
LinuxAndUbuntu Newsletter
Join the newsletter to receive the latest updates in your inbox.


